前言
- Swagger支持 API 自动生成同步的在线文档:使用 Swagger 后可以直接通过代码生成文档,不再需要自己手动编写接口文档了
- 提供 Web 页面在线测试 API:光有文档还不够,Swagger 生成的文档还支持在线测试
开始
下面将给出在SpringBoot2项目中使用Swagger的基本步骤,这里将Swagger配置类单独拿出,作为公共配置部分。
导入依赖
在pom.xml文件中导入依赖
1
2
3
4
5
6
7
8
9
|
<dependency>
<groupId>io.springfox</groupId>
<artifactId>springfox-swagger2</artifactId>
</dependency>
<dependency>
<groupId>io.springfox</groupId>
<artifactId>springfox-swagger-ui</artifactId>
</dependency>
|
添加配置类
1
2
3
4
5
6
7
8
9
10
11
12
13
14
15
16
17
18
19
20
21
22
23
24
25
26
27
28
29
30
31
32
33
34
35
36
37
38
39
40
41
42
43
44
45
46
47
48
49
50
51
52
53
54
55
56
57
58
59
60
61
62
| package com.xlh.yygh.common.config;
import com.google.common.base.Predicates;
import org.springframework.context.annotation.Bean;
import org.springframework.context.annotation.Configuration;
import springfox.documentation.builders.ApiInfoBuilder;
import springfox.documentation.builders.PathSelectors;
import springfox.documentation.service.ApiInfo;
import springfox.documentation.service.Contact;
import springfox.documentation.spi.DocumentationType;
import springfox.documentation.spring.web.plugins.Docket;
import springfox.documentation.swagger2.annotations.EnableSwagger2;
@Configuration
@EnableSwagger2
public class Swagger2Config {
@Bean
public Docket webApiConfig(){
return new Docket(DocumentationType.SWAGGER_2)
.groupName("webApi")
.apiInfo(webApiInfo())
.select()
.paths(Predicates.and(PathSelectors.regex("/api/.*")))
.build();
}
@Bean
public Docket adminApiConfig(){
return new Docket(DocumentationType.SWAGGER_2)
.groupName("adminApi")
.apiInfo(adminApiInfo())
.select()
.paths(Predicates.and(PathSelectors.regex("/admin/.*")))
.build();
}
private ApiInfo webApiInfo(){
return new ApiInfoBuilder()
.title("网站-API文档")
.description("本文档描述了网站微服务接口定义")
.version("1.0")
.contact(new Contact("xlh", "http://xlh.com", "1583677918@qq.com"))
.build();
}
private ApiInfo adminApiInfo(){
return new ApiInfoBuilder()
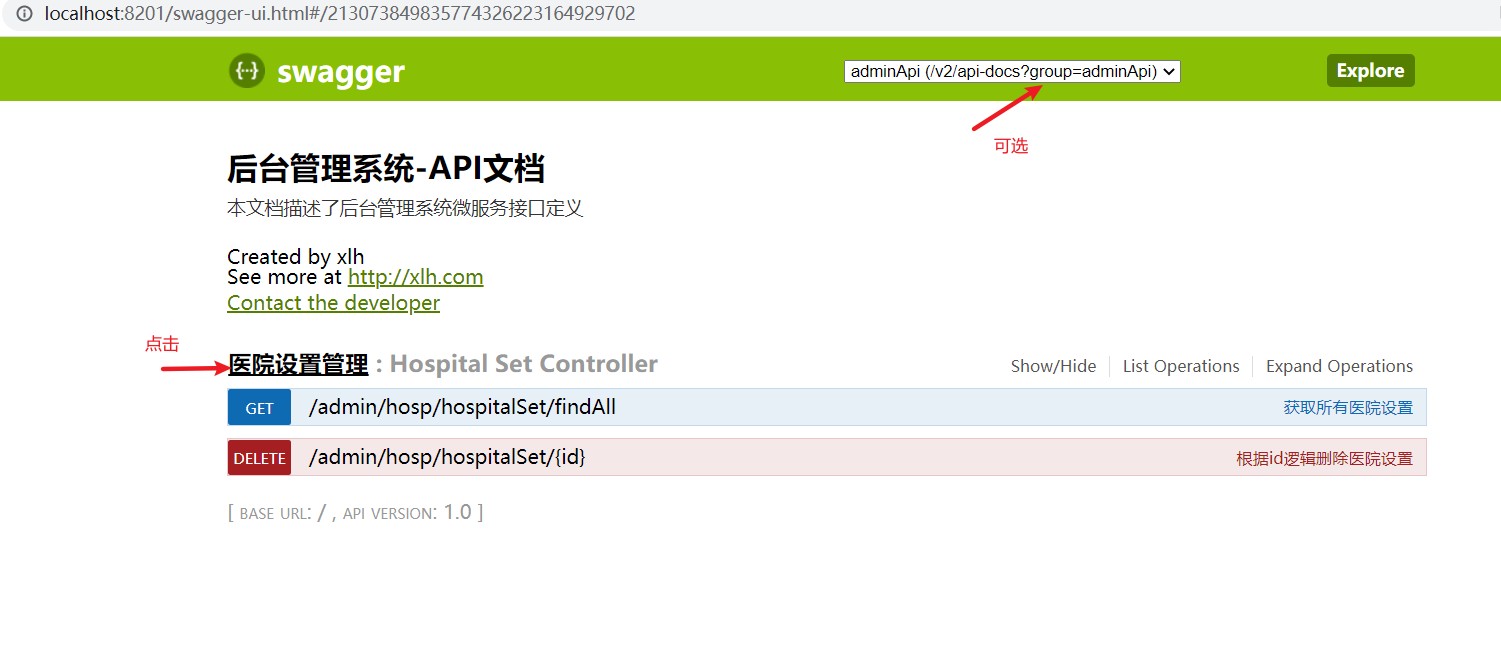
.title("后台管理系统-API文档")
.description("本文档描述了后台管理系统微服务接口定义")
.version("1.0")
.contact(new Contact("xlh", "http://xlh.com", "1583677918@qq.com"))
.build();
}
}
|
启动类扫描
注意:需要将配置类所在模块在pom.xml中引入
1
2
3
4
5
| <dependency>
<groupId>com.xlh</groupId>
<artifactId>service_util</artifactId>
<version>0.0.1-SNAPSHOT</version>
</dependency>
|
1
2
3
4
5
6
7
8
9
10
11
12
13
14
| package com.xlh.yygh.hosp;
import org.springframework.boot.SpringApplication;
import org.springframework.boot.autoconfigure.SpringBootApplication;
import org.springframework.context.annotation.ComponentScan;
@SpringBootApplication
@ComponentScan(basePackages = "com.xlh")
public class ServiceHospApplication {
public static void main(String[] args) {
SpringApplication.run(ServiceHospApplication.class, args);
}
}
|
注释
可在controller中添加接口说明
1
2
3
4
5
6
7
8
9
10
11
12
13
14
15
16
17
18
19
20
21
22
23
24
25
26
27
28
29
30
31
32
| package com.xlh.yygh.hosp.controller;
import com.xlh.yygh.hosp.service.HospitalSetService;
import com.xlh.yygh.model.hosp.HospitalSet;
import io.swagger.annotations.Api;
import io.swagger.annotations.ApiOperation;
import org.springframework.beans.factory.annotation.Autowired;
import org.springframework.web.bind.annotation.*;
import java.util.List;
@Api(tags = "医院设置管理")
@RestController
@RequestMapping("/admin/hosp/hospitalSet")
public class HospitalSetController {
@Autowired
private HospitalSetService hospitalSetService;
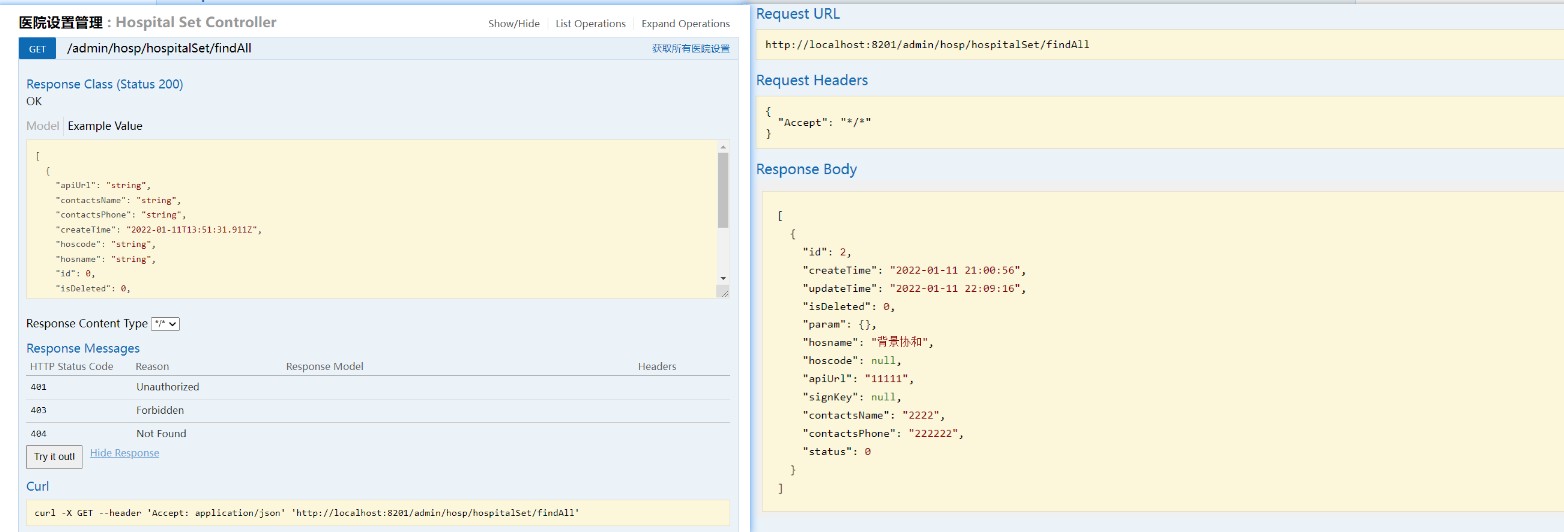
@ApiOperation(value = "获取所有医院设置")
@GetMapping("/findAll")
public List<HospitalSet> findAll(){
return hospitalSetService.list();
}
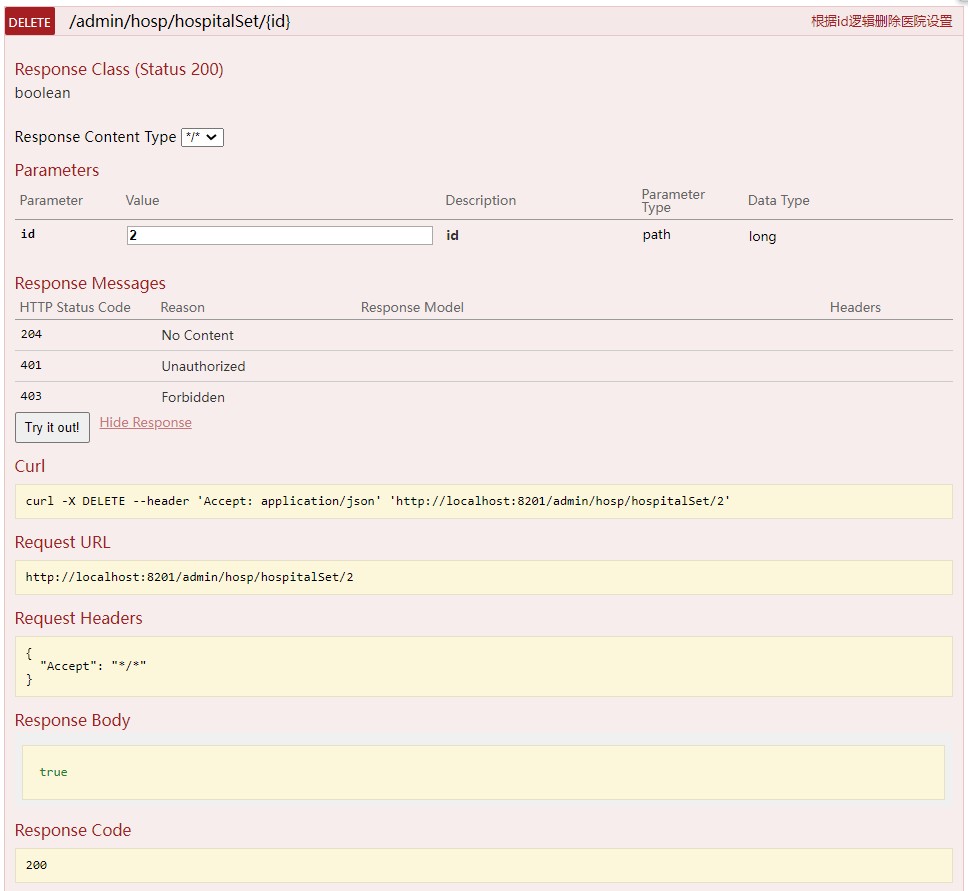
@ApiOperation(value = "根据id逻辑删除医院设置")
@DeleteMapping("{id}")
public boolean removeHospSet(@PathVariable Long id){
return hospitalSetService.removeById(id);
}
}
|
使用

.jpg)
.jpg)
.jpg)
.jpg)
.jpg)
.jpg)
.jpg)
.jpg)
.jpg)
.jpg)
.jpg)