
MyBatisPlus入门
预览
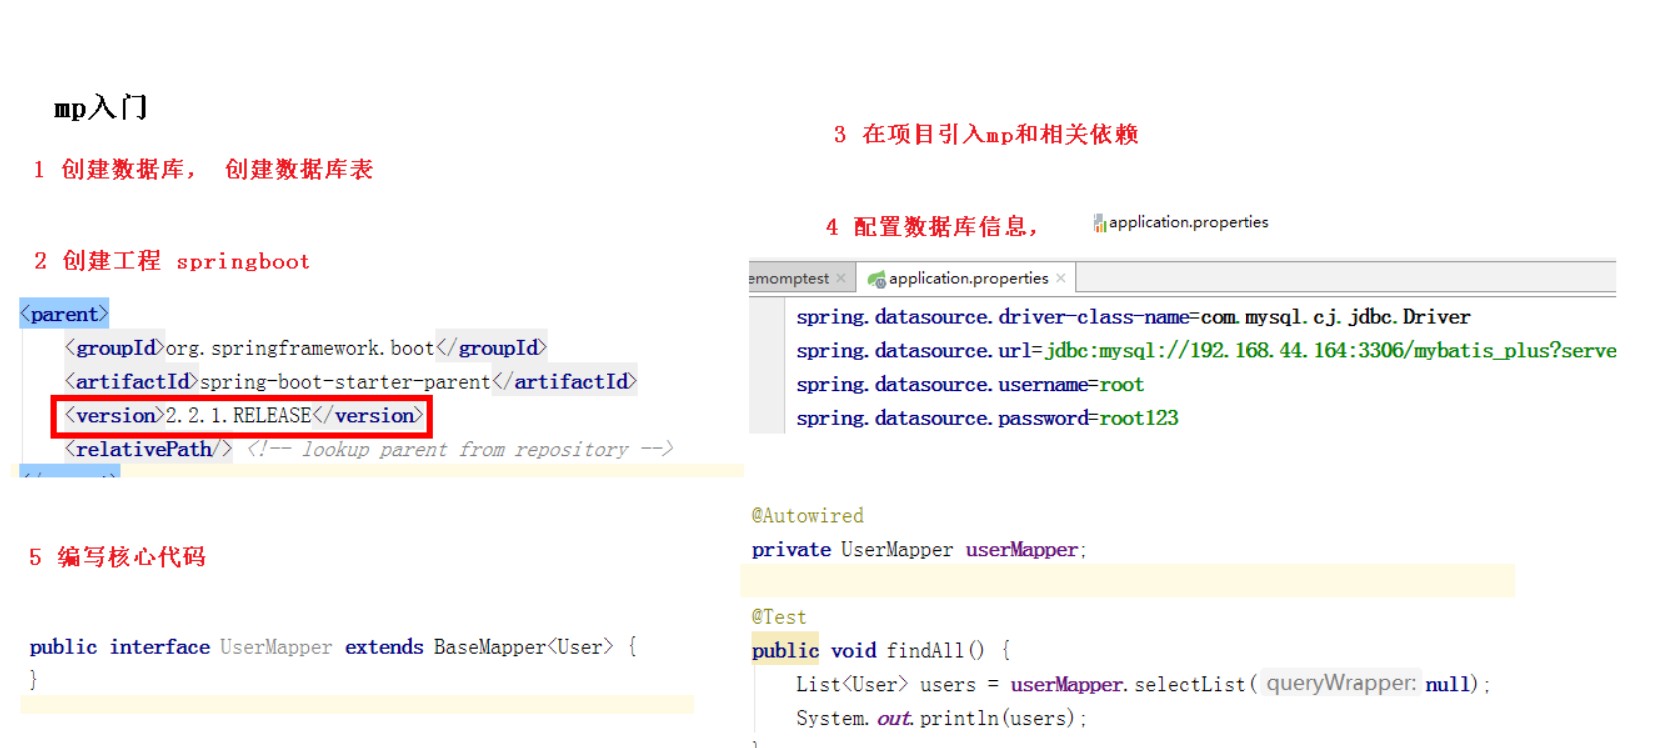
入门案例
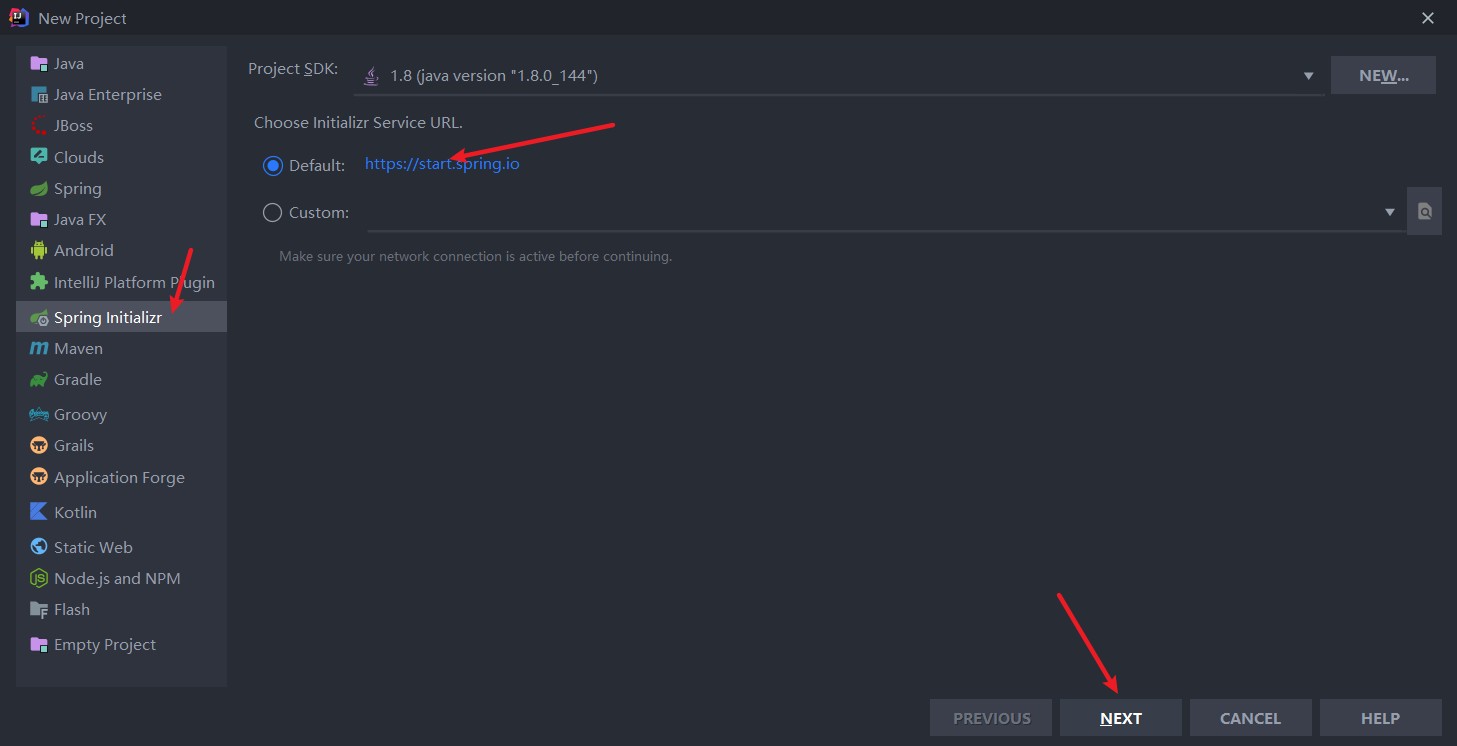
- 创建SpringBoot项目
- 导入相关依赖(mysql版本要与配置文件对应,mysql5和mysql8有所区别)
1 |
|
安装Lombok插件,使得简化get/set方法,简洁高效
配置
application.properties文件(如果mysql>=8.0,则需要加时区,classname也需要更改)1
2
3
4
5
6spring.datasource.driver-class-name=com.mysql.jdbc.Driver
spring.datasource.url=jdbc:mysql://localhost:3306/mybatis_plus
spring.datasource.username=root
spring.datasource.password=root
#mybatis日志
mybatis-plus.configuration.log-impl=org.apache.ibatis.logging.stdout.StdOutImpl创建实体类(使用@Data注解简化代码)
1
2
3
4
5
6
7
8
9
10
11package com.xlh.mpdemo.entity;
import lombok.Data;
public class User {
private Long id;
private String name;
private Integer age;
private String email;
}创建mapper
1
2
3
4
5
6
7
8
9package com.xlh.mpdemo.mapper;
import com.baomidou.mybatisplus.core.mapper.BaseMapper;
import com.xlh.mpdemo.entity.User;
import org.springframework.stereotype.Repository;
public interface UserMapper extends BaseMapper<User> {
}在启动类里添加组件扫描
1
2
3
4
5
6
7
8
9
10
11
12
13
14
15package com.xlh.mpdemo;
import org.mybatis.spring.annotation.MapperScan;
import org.springframework.boot.SpringApplication;
import org.springframework.boot.autoconfigure.SpringBootApplication;
public class MpdemoApplication {
public static void main(String[] args) {
SpringApplication.run(MpdemoApplication.class, args);
}
}建立数据库及数据表,数据库名为
mybatis_plus1
2
3
4
5
6
7
8
9
10
11
12
13
14
15CREATE TABLE USER
(
id BIGINT(20)NOT NULL COMMENT '主键ID',
NAME VARCHAR(30)NULL DEFAULT NULL COMMENT '姓名',
age INT(11)NULL DEFAULT NULL COMMENT '年龄',
email VARCHAR(50)NULL DEFAULT NULL COMMENT '邮箱',
PRIMARY KEY (id)
);
INSERT INTO user (id, name, age, email)VALUES
(1, 'Jone', 18, 'test1@baomidou.com'),
(2, 'Jack', 20, 'test2@baomidou.com'),
(3, 'Tom', 28, 'test3@baomidou.com'),
(4, 'Sandy', 21, 'test4@baomidou.com'),
(5, 'Billie', 24, 'test5@baomidou.com');在测试类中查表
1
2
3
4
5
6
7
8
9
10
11
12
13
14
15
16
17
18
19
20
21package com.xlh.mpdemo;
import com.xlh.mpdemo.entity.User;
import com.xlh.mpdemo.mapper.UserMapper;
import org.junit.jupiter.api.Test;
import org.springframework.beans.factory.annotation.Autowired;
import org.springframework.boot.test.context.SpringBootTest;
import java.util.List;
class MpdemoApplicationTests {
private UserMapper userMapper;
void findall() {
List<User> users = userMapper.selectList(null);
System.out.println(users);
}
}
添加
1 |
|
主键策略
ASSIGN_ID
MyBatis-Plus默认的主键策略是:ASSIGN_ID (使用了雪花算法),雪花算法:分布式ID生成器
1 |
|
AUTO 自增策略
需要在创建数据表的时候设置主键自增.
1 |
|
也可设置全局作用:
1 | mybatis-plus.global-config.db-config.id-type=auto |
更新
修改
1 |
|
自动填充
在数据表中添加两个字段:create_time、update_time,类型为datetime
在User实体类中对应驼峰命名,并添加注解
1
2
3
4
5
6
7//在插入时自动填充
private Date createTime;
//在修改和插入时自动填充
private Date updateTime;创建元对象处理器接口实现类
1
2
3
4
5
6
7
8
9
10
11
12
13
14
15
16
17
18
19
20
21package com.xlh.mpdemo.handler;
import com.baomidou.mybatisplus.core.handlers.MetaObjectHandler;
import org.apache.ibatis.reflection.MetaObject;
import org.springframework.stereotype.Component;
import java.util.Date;
public class MyMetaObjectHandler implements MetaObjectHandler {
public void insertFill(MetaObject metaObject) {
this.setFieldValByName("createTime",new Date(),metaObject);
this.setFieldValByName("updateTime",new Date(),metaObject);
}
public void updateFill(MetaObject metaObject) {
this.setFieldValByName("updateTime",new Date(),metaObject);
}
}
乐观锁
主要适用场景:当要更新一条记录的时候,希望这条记录没有被别人更新,也就是说实现线程安全的数据更新。
乐观锁实现方式:
- 取出记录时,获取当前version
- 更新时,带上这个version
- 执行更新时, set version = newVersion where version = oldVersion
- 如果version不对,就更新失败
操作步骤
在数据表中添加字段
version,类型为int在类中添加属性和注解
1
2
3//代表版本号
private Integer version;配置乐观锁插件
创建配置类,并注册插件
1
2
3
4
5
6
7
8
9
10
11
12
13
14
15
16
17
18package com.xlh.mpdemo.config;
import com.baomidou.mybatisplus.extension.plugins.OptimisticLockerInterceptor;
import org.mybatis.spring.annotation.MapperScan;
import org.springframework.context.annotation.Bean;
import org.springframework.context.annotation.Configuration;
//配置类
public class MpConfig {
/**
* 乐观锁插件
*/
public OptimisticLockerInterceptor optimisticLockerInterceptor() {
return new OptimisticLockerInterceptor();
}
}
测试乐观琐(更新时,如果版本号符合则成功,版本+1,;否则失败)
1
2
3
4
5
6
7
public void testOptimisticLocker(){
User user=userMapper.selectById(1480518292787113986L);
user.setName("22222");
int count = userMapper.updateById(user);
System.out.println(count);
}
查询
多个id批量查询
1
2
3
4
5
public void testSelectByIds(){
List<User> users=userMapper.selectBatchIds(Arrays.asList(1,2,3));
System.out.println(users);
}条件查询
1
2
3
4
5
6
7
8
public void testSelect2() {
Map<String, Object> columnMap = new HashMap<>();
columnMap.put("name","Jack");
columnMap.put("age",20);
List<User> users = userMapper.selectByMap(columnMap);
System.out.println(users);
}分页
在
MpConfig配置类中配置分页插件1
2
3
4
5
6
7/**
* 分页插件
*/
public PaginationInterceptor paginationInterceptor() {
return new PaginationInterceptor();
}测试
1
2
3
4
5
6
7
8
9
10
11
12
13
14
15
16
17
18
public void testSelectPage() {
Page<User> page = new Page(1,3);
Page<User> userPage = userMapper.selectPage(page, null);
//返回对象得到分页所有数据
long pages = userPage.getPages(); //总页数
long current = userPage.getCurrent(); //当前页
List<User> records = userPage.getRecords(); //查询数据集合
long total = userPage.getTotal(); //总记录数
boolean hasNext = userPage.hasNext(); //下一页
boolean hasPrevious = userPage.hasPrevious(); //上一页
System.out.println(pages);
System.out.println(current);
System.out.println(records);
System.out.println(total);
System.out.println(hasNext);
System.out.println(hasPrevious);
}
删除
根据id删除
1
2
3
4
5
public void testDeleteById(){
int result = userMapper.deleteById(5L);
System.out.println(result);
}根据id批量删除
1
2
3
4
5
public void testDeleteBatchIds() {
int result = userMapper.deleteBatchIds(Arrays.asList(1,2));
System.out.println(result);
}条件删除
1
2
3
4
5
6
7
8
public void testDeleteByMap() {
HashMap<String, Object> map = new HashMap<>();
map.put("name", "Tom");
map.put("age", 28);
int result = userMapper.deleteByMap(map);
System.out.println(result);
}逻辑删除和物理删除
- 物理删除:真实删除,将对应数据从数据库中删除,之后查询不到此条被删除数据
- 逻辑删除:假删除,将对应数据中代表是否被删除字段状态修改为“被删除状态”,之后在数据库中仍旧能看到此条数据记录
逻辑删除实现
数据表中添加字段
deleted,类型为int添加属性和注解,初始值为0
1
2
3
private Integer deleted;此时删除后,deleted会变为1
复杂查询
删除年龄大于等于12的
1
2
3
4
5
6
7
8
9
public void testQuery() {
QueryWrapper<User> queryWrapper = new QueryWrapper<>();
//greater&&equals,查询年龄大于等于12岁的数据
queryWrapper.ge("age", 12);
System.out.println(queryWrapper);
int result = userMapper.delete(queryWrapper);
System.out.println("delete return count = " + result);
}查询名为“sandy”的数据
1
2
3
4
5
6
7
public void testSelectOne() {
QueryWrapper<User>queryWrapper = new QueryWrapper<>();
queryWrapper.eq("name", "Sandy");
User user = userMapper.selectOne(queryWrapper);//只能返回一条记录,多余一条则抛出异常
System.out.println(user);
}between使用
1
2
3
4
5
6
7
public void testSelectCount() {
QueryWrapper<User>queryWrapper = newQueryWrapper<>();
queryWrapper.between("age", 20, 30);
Integer count = userMapper.selectCount(queryWrapper); //返回数据数量
System.out.println(count);
}like的使用
1
2
3
4
5
6
7
public void testSelectMaps() {
QueryWrapper<User>queryWrapper = new QueryWrapper<>();
queryWrapper.like("name", "e").likeRight("email", "5");
List<User> users = userMapper.selectList(queryWrapper);//返回值是Map列表
System.out.println(users);
}orderby的使用
1
2
3
4
5
6
7
8
public void testSelectListOrderBy() {
QueryWrapper<User>queryWrapper = new QueryWrapper<>();
//按年龄降序
queryWrapper.orderByDesc("age");
List<User>users = userMapper.selectList(queryWrapper);
users.forEach(System.out::println);
}
本博客所有文章除特别声明外,均采用 CC BY-NC-SA 4.0 许可协议。转载请注明来自 xlhの博客!
.jpg)
.jpg)
.jpg)
.jpg)
.jpg)
.jpg)
.jpg)
.jpg)
.jpg)
.jpg)
.jpg)