一、阿里云oss简介
用户认证需要上传证件图片、首页轮播也需要上传图片,因此我们要做文件服务,阿里云oss是一个很好的分布式文件服务系统,只需要集成阿里云oss即可。
二、开通“对象存储OSS”服务
- 申请阿里云账号
- 实名认证
- 开通“对象存储OSS”服务
- 进入管理控制台
三、创建Bucket
选择:标准存储、公共读、不开通,如下:

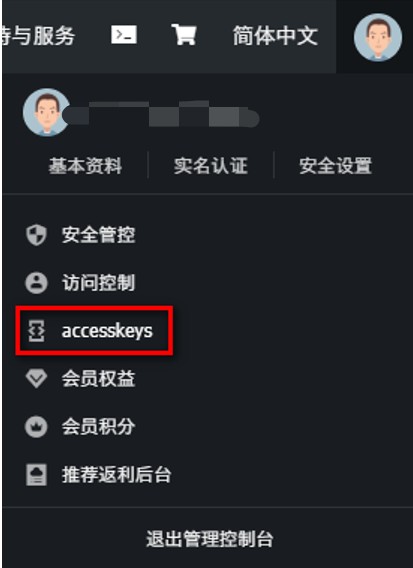
四、获取用户acesskeys
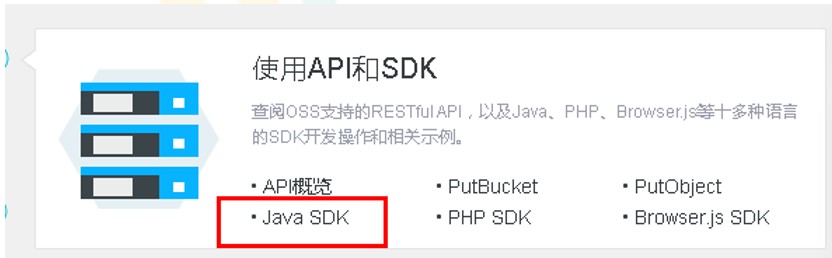
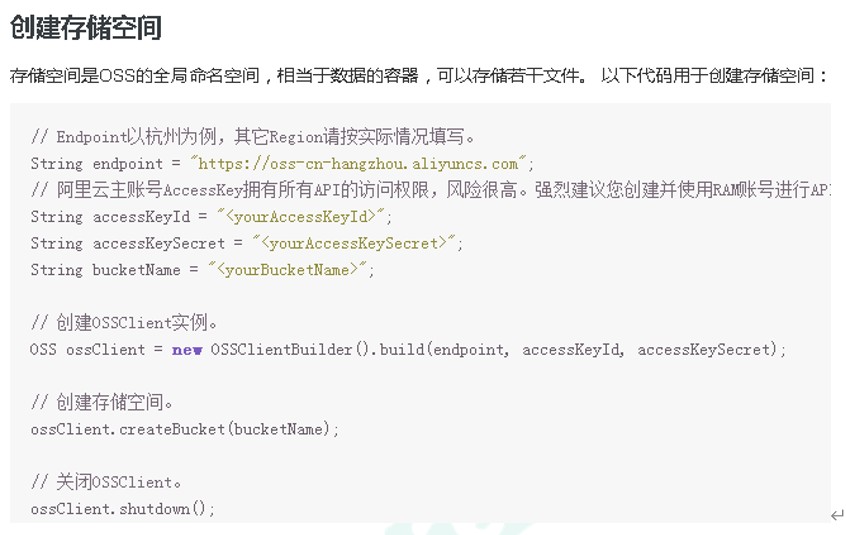
五、使用SDK文档
六、开始
1、搭建service-oss模块
1
2
3
4
5
6
7
8
9
10
11
12
13
| <dependencies>
<dependency>
<groupId>com.aliyun.oss</groupId>
<artifactId>aliyun-sdk-oss</artifactId>
</dependency>
<dependency>
<groupId>joda-time</groupId>
<artifactId>joda-time</artifactId>
</dependency>
</dependencies>
|
2、添加配置文件application.properties
1
2
3
4
5
6
7
8
9
10
11
12
13
14
15
16
17
18
19
20
|
server.port=8205
spring.application.name=service-oss
spring.profiles.active=dev
spring.jackson.date-format=yyyy-MM-dd HH:mm:ss
spring.jackson.time-zone=GMT+8
spring.cloud.nacos.discovery.server-addr=localhost:8848
aliyun.oss.endpoint=oss-cn-shanghai.aliyuncs.com
aliyun.oss.accessKeyId=LTAI5tQ****6GkzqU5bY
aliyun.oss.secret=eWnDWoIK****GkcbjrXH
aliyun.oss.bucket=yygh-xlh
|
3、启动类
1
2
3
4
5
6
7
8
9
10
11
12
13
14
15
16
17
| package com.xlh.yygh.oss;
import org.springframework.boot.SpringApplication;
import org.springframework.boot.autoconfigure.SpringBootApplication;
import org.springframework.boot.autoconfigure.jdbc.DataSourceAutoConfiguration;
import org.springframework.cloud.client.discovery.EnableDiscoveryClient;
import org.springframework.context.annotation.ComponentScan;
@SpringBootApplication(exclude = DataSourceAutoConfiguration.class)
@EnableDiscoveryClient
@ComponentScan(basePackages = {"com.xlh"})
public class ServiceOssApplication {
public static void main(String[] args) {
SpringApplication.run(ServiceOssApplication.class, args);
}
}
|
4、配置网关
1
2
3
4
5
6
|
spring.cloud.gateway.routes[3].id=service-oss
spring.cloud.gateway.routes[3].uri=lb://service-oss
spring.cloud.gateway.routes[3].predicates= Path=/*/oss/**
|
5、测试(可跳过)
6、创建ConstantOssPropertiesUtils配置类
1
2
3
4
5
6
7
8
9
10
11
12
13
14
15
16
17
18
19
20
21
22
23
24
25
26
27
28
29
30
31
32
33
34
| package com.xlh.yygh.oss.utils;
import org.springframework.beans.factory.InitializingBean;
import org.springframework.beans.factory.annotation.Value;
import org.springframework.stereotype.Component;
@Component
public class ConstantOssPropertiesUtils implements InitializingBean {
@Value("${aliyun.oss.endpoint}")
private String endpoint;
@Value("${aliyun.oss.accessKeyId}")
private String accessKeyId;
@Value("${aliyun.oss.secret}")
private String secret;
@Value("${aliyun.oss.bucket}")
private String bucket;
public static String EDNPOINT;
public static String ACCESS_KEY_ID;
public static String SECRECT;
public static String BUCKET;
@Override
public void afterPropertiesSet() throws Exception {
EDNPOINT=endpoint;
ACCESS_KEY_ID=accessKeyId;
SECRECT=secret;
BUCKET=bucket;
}
}
|
7、封装service接口
1
2
3
4
5
6
7
| package com.xlh.yygh.oss.service;
import org.springframework.web.multipart.MultipartFile;
public interface FileService {
String upload(MultipartFile file);
}
|
1
2
3
4
5
6
7
8
9
10
11
12
13
14
15
16
17
18
19
20
21
22
23
24
25
26
27
28
29
30
31
32
33
34
35
36
37
38
39
40
41
42
43
44
45
46
47
48
49
50
| package com.xlh.yygh.oss.service.impl;
import com.aliyun.oss.OSS;
import com.aliyun.oss.OSSClientBuilder;
import com.xlh.yygh.oss.service.FileService;
import com.xlh.yygh.oss.utils.ConstantOssPropertiesUtils;
import org.joda.time.DateTime;
import org.springframework.stereotype.Service;
import org.springframework.web.multipart.MultipartFile;
import java.io.IOException;
import java.io.InputStream;
import java.util.UUID;
@Service
public class FileServiceImpl implements FileService {
@Override
public String upload(MultipartFile file) {
String endpoint = ConstantOssPropertiesUtils.EDNPOINT;
String accessKeyId = ConstantOssPropertiesUtils.ACCESS_KEY_ID;
String accessKeySecret = ConstantOssPropertiesUtils.SECRECT;
String bucketName = ConstantOssPropertiesUtils.BUCKET;
try {
OSS ossClient = new OSSClientBuilder().build(endpoint, accessKeyId, accessKeySecret);
InputStream inputStream = file.getInputStream();
String fileName = file.getOriginalFilename();
String uuid = UUID.randomUUID().toString().replaceAll("-","");
fileName = uuid+fileName;
String timeUrl = new DateTime().toString("yyyy/MM/dd");
fileName = timeUrl+"/"+fileName;
ossClient.putObject(bucketName, fileName, inputStream);
ossClient.shutdown();
String url = "https://"+bucketName+"."+endpoint+"/"+fileName;
return url;
} catch (IOException e) {
e.printStackTrace();
return null;
}
}
}
|
8、封装controller接口
1
2
3
4
5
6
7
8
9
10
11
12
13
14
15
16
17
18
19
20
21
22
23
24
| package com.xlh.yygh.oss.controller;
import com.xlh.yygh.common.result.Result;
import com.xlh.yygh.oss.service.FileService;
import org.springframework.beans.factory.annotation.Autowired;
import org.springframework.web.bind.annotation.PostMapping;
import org.springframework.web.bind.annotation.RequestMapping;
import org.springframework.web.bind.annotation.RestController;
import org.springframework.web.multipart.MultipartFile;
@RestController
@RequestMapping("/api/oss/file")
public class FileApiController {
@Autowired
private FileService fileService;
@PostMapping("/fileUpload")
public Result fileUpload(MultipartFile file) {
String url = fileService.upload(file);
return Result.ok(url);
}
}
|
9、完成
执行上传接口后,就会按照规则上传到指定目录并返回文件的访问地址

.jpg)
.jpg)
.jpg)
.jpg)
.jpg)
.jpg)
.jpg)
.jpg)
.jpg)
.jpg)
.jpg)