
SpringBoot2入门
SpringBoot2的功能
- 创建独立Spring应用
- 内嵌web服务器
- 自动starter依赖,简化构建配置
- 自动配置Spring以及第三方功能
- 提供生产级别的监控、健康检查及外部化配置
- 无代码生成、无需编写XML
- SpringBoot是整合Spring技术栈的一站式框架
- SpringBoot是简化Spring技术栈的快速开发脚手架
开始
官方文档:https://spring.io/projects/spring-boot#learn
系统要求
Java 8]& 兼容java14 .
Maven 3.3+
idea 2019.1.2
HelloWorld
创建Maven工程
引入依赖和父工程
1
2
3
4
5
6
7
8
9
10
11
12
13<parent>
<groupId>org.springframework.boot</groupId>
<artifactId>spring-boot-starter-parent</artifactId>
<version>2.3.4.RELEASE</version>
</parent>
<dependencies>
<dependency>
<groupId>org.springframework.boot</groupId>
<artifactId>spring-boot-starter-web</artifactId>
</dependency>
</dependencies>创建主程序
1
2
3
4
5
6
7
8
9
10
11
12
13
package cn.xlh.boot;
import org.springframework.boot.SpringApplication;
import org.springframework.boot.autoconfigure.SpringBootApplication;
//使用注解来表示这是一个springboot类,主程序
public class MainApplication {
public static void main(String[] args) {
SpringApplication.run(MainApplication.class, args);
}
}编写一个类
1
2
3
4
5
6
7
8
9
10
11
12
13
14
15
16
17
package cn.xlh.boot.controller;
import org.springframework.stereotype.Controller;
import org.springframework.web.bind.annotation.RequestMapping;
import org.springframework.web.bind.annotation.ResponseBody;
import org.springframework.web.bind.annotation.RestController;
//@ResponseBody // 返回
//@Controller
//可代替上方两个注解
public class HelloController {
public String handle01(){
return "Hello Spring Boot 2!";
}
}测试:直接运行main方法
在浏览器输入http://localhost:8080/hello即可查看效果
1
Hello Spring Boot 2!
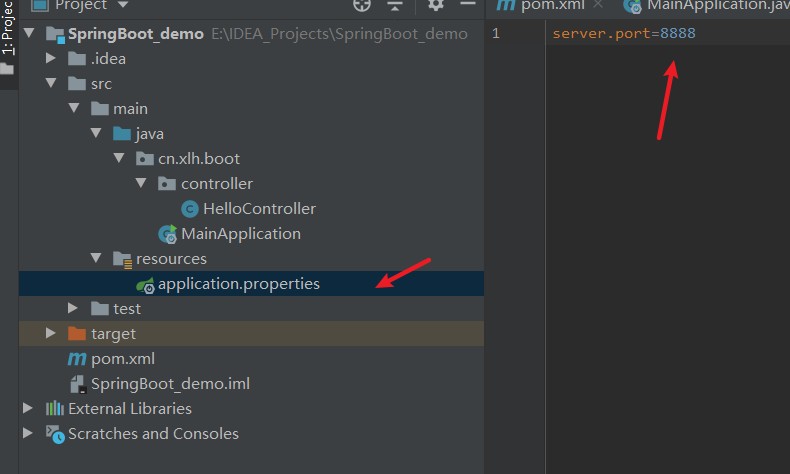
简化配置
使用
application.properties作为配置文件举例:修改端口号
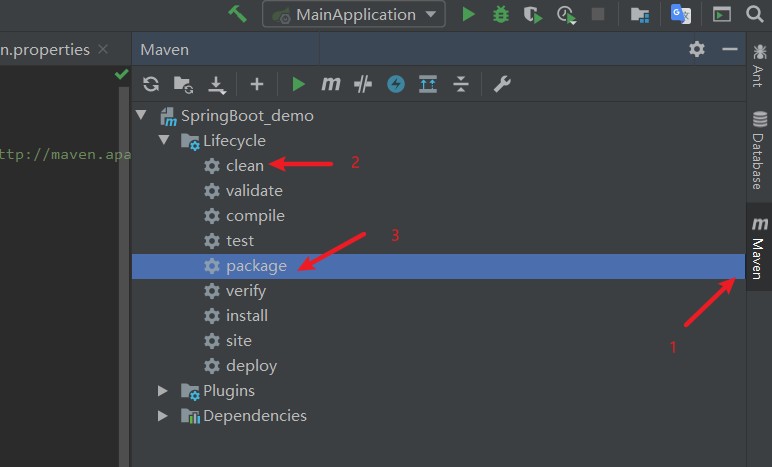
简化部署
- 在项目的pom.xml中,添加如下代码
1 | <build> |
- 接着按照如下步骤,打包该项目
- 接着会产生一个jar文件
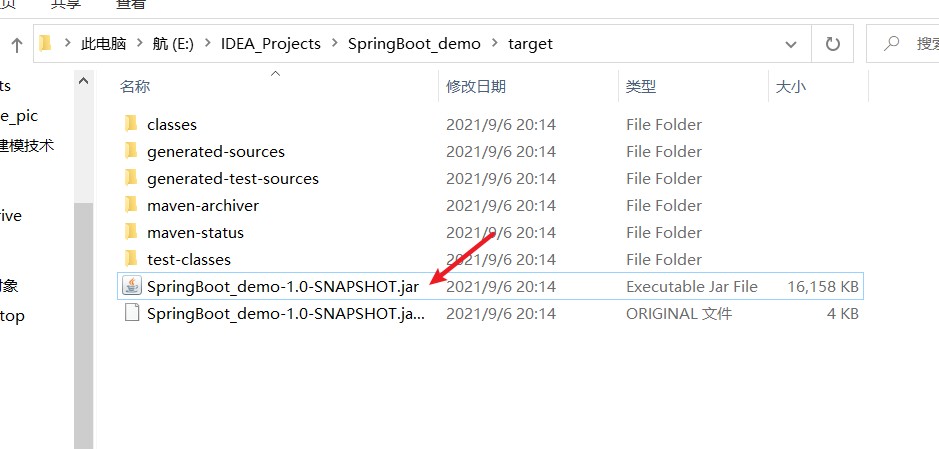
- 在该文件夹下打开cmd,运行如下命令
1 | E:\IDEA_Projects\SpringBoot_demo\target>java -jar SpringBoot_demo-1.0-SNAPSHOT.jar |
接着在浏览器使用相应的地址打开即可
注意点:如果cmd开启了快速编辑模式,则需要关闭,否则可能不成功
了解自动配置的原理
依赖管理
- 父项目做依赖管理,几乎声明了所有开发中常用的依赖的版本号,自动版本仲裁机制
无需关注版本号
1
21、引入依赖默认都可以不写版本
2、引入非版本仲裁的jar,要写版本号修改版本号
1
2
3
4
51、查看spring-boot-dependencies里面规定当前依赖的版本 用的 key。
2、在当前项目里面重写配置
<properties>
<mysql.version>5.1.43</mysql.version>
</properties>开发导入starter场景启动器
1
2
3
4
5
6
7
8
9
10
11
121、见到很多 spring-boot-starter-* : *就某种场景
2、只要引入starter,这个场景的所有常规需要的依赖我们都自动引入
3、SpringBoot所有支持的场景
https://docs.spring.io/spring-boot/docs/current/reference/html/using-spring-boot.html#using-boot-starter
4、见到的 *-spring-boot-starter: 第三方为我们提供的简化开发的场景启动器。
5、所有场景启动器最底层的依赖
<dependency>
<groupId>org.springframework.boot</groupId>
<artifactId>spring-boot-starter</artifactId>
<version>2.3.4.RELEASE</version>
<scope>compile</scope>
</dependency>自动配好Tomcat
自动配好SpringMVC
- 引入SpringMVC全套组件
- 自动配好SpringMVC常用组件(功能)
自动配好Web常见功能,如:字符编码问题
默认的包结构
- 主程序所在包及其下面的所有子包里面的组件都会被默认扫描进来
- 无需以前的包扫描配置
- 想要改变扫描路径,@SpringBootApplication(scanBasePackages=“com.atguigu”)或@ComponentScan 指定扫描路径
各种配置拥有默认值
- 默认配置最终都是映射到某个类上,如:MultipartProperties
- 按需加载所有自动配置项
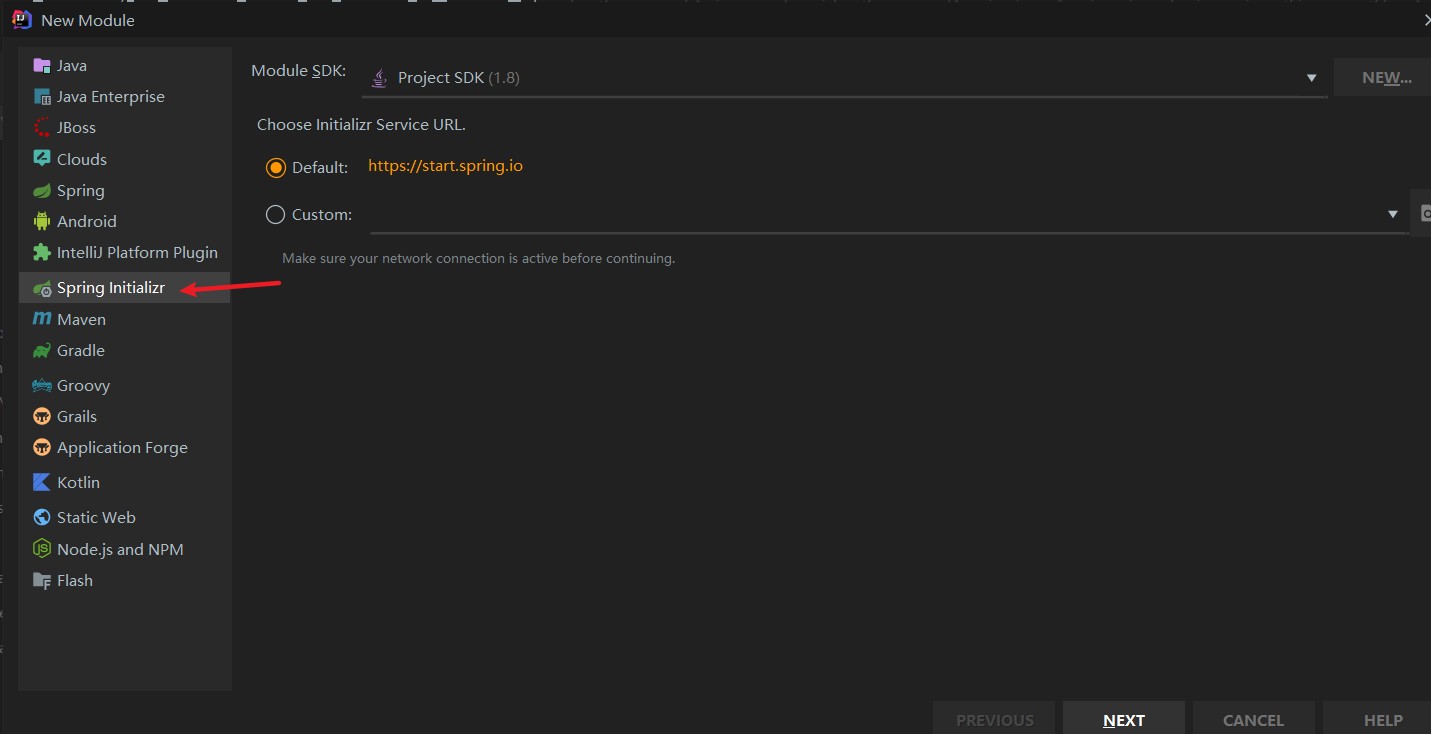
创建一个SpringBoot的Module
- 如下图
yaml配置注入
SpringBoot使用一个全局的配置文件 , 配置文件名称是固定的
application.properties
- 语法结构 :key=value
application.yml
- 语法结构 :key: value(一定要有一个空格)
配置文件的作用 :修改SpringBoot自动配置的默认值,因为SpringBoot在底层都给我们自动配置好了;比如我们可以在配置文件中修改Tomcat 默认启动的端口号
yaml概述
这种语言以数据作为中心,而不是以标记语言为重点!以前的配置文件,大多数都是使用xml来配置;比如一个简单的端口配置,我们来对比下yaml和xml。
- 传统xml配置:
1 | <server> |
- yaml配置:
1 | server: |
yaml基础语法
说明:语法要求严格!
空格不能省略
以缩进来控制层级关系,只要是左边对齐的一列数据都是同一个层级的。
属性和值的大小写都是十分敏感的。
字面量:普通的值 [ 数字,布尔值,字符串 ]
字面量直接写在后面就可以 , 字符串默认不用加上双引号或者单引号;
注意:
- “ ” 双引号,不会转义字符串里面的特殊字符 , 特殊字符会作为本身想表示的意思;
比如 :name: “kuang \n shen” 输出 :kuang 换行 shen
- ‘’ 单引号,会转义特殊字符 , 特殊字符最终会变成和普通字符一样输出
比如 :name: ‘kuang \n shen’ 输出 :kuang \n shen
对象、Map(键值对)
1 | #对象、Map格式 |
- 在下一行来写对象的属性和值得关系,注意缩进;比如
1 | student: |
- 行内写法
1 | student: {name: qinjiang,age: 3} |
数组( List、set )
- 用 - 值表示数组中的一个元素,举例:
1 | pets: |
- 行内写法
1 | pets: [cat,dog,pig] |
注入配置文件
在springboot项目中的resources目录下新建一个文件
application.yamlIDEA 提示,springboot配置注解处理器没有找到;可以加一个依赖(可以不加)
1
2
3
4
5<dependency>
<groupId>org.springframework.boot</groupId>
<artifactId>spring-boot-configuration-processor</artifactId>
<optional>true</optional>
</dependency>编写一个实体类 Dog
1
2
3
4
5
6
7
8
9
10
11
12
13
14
15
16
17
18
19
20
21
22
23
24
25
26
27
28
29
30
31
32
33
34
35
36
37
38
39
40
41
42
43package cn.xlh.boot.bean;
import org.springframework.boot.context.properties.ConfigurationProperties;
import org.springframework.stereotype.Component;
//加入配置属性
public class Dog {
private String name;
private Integer age;
public Dog() {
}
public Dog(String name, Integer age) {
this.name = name;
this.age = age;
}
public String getName() {
return name;
}
public void setName(String name) {
this.name = name;
}
public Integer getAge() {
return age;
}
public void setAge(Integer age) {
this.age = age;
}
public String toString() {
return "Dog{" +
"name='" + name + '\'' +
", age=" + age +
'}';
}
}在application.yaml中加入属性配置
1
2
3dog:
name: 旺财
age: 12测试
1
2
3
4
5
6
7
8
9
10
11
12
13
14
15
16
17
18
19
20package cn.xlh.boot.bean;
import org.junit.Test;
import org.junit.runner.RunWith;
import org.springframework.beans.factory.annotation.Autowired;
import org.springframework.boot.test.context.SpringBootTest;
import org.springframework.test.context.junit4.SpringRunner;
//启动测试注解
public class TestDemo1 {
private Dog dog;
public void test01() {
System.out.println(dog);
}
}加载指定配置文件
1
2
3
4
5
6
7
8
9
//注册bean
public class Person {
private String name;
......
}配置文件占位符
1
2
3
4
5
6
7
8
9
10
11
12
13person:
name: qinjiang${random.uuid} # 随机uuid
age: ${random.int} # 随机int
happy: false
birth: 2000/01/01
maps: {k1: v1,k2: v2}
lists:
- code
- girl
- music
dog:
name: ${person.hello:other}_旺财
age: 1
JSR303数据校验
Springboot中可以用@validated来校验数据,如果数据异常则会统一抛出异常,方便异常中心统一处理。
1
2
3
4
5
6
7
8//注册bean
//数据校验
public class Person {
//name必须是邮箱格式
private String name;
}常见参数
1
2
3
4
5
6
7
8
9
10
11
12
13
14
15
16
17
18
19
20
21
22
23
24
25
26
27
28
29@NotNull(message="名字不能为空")
private String userName;
@Max(value=120,message="年龄最大不能查过120")
private int age;
@Email(message="邮箱格式错误")
private String email;
空检查
@Null 验证对象是否为null
@NotNull 验证对象是否不为null, 无法查检长度为0的字符串
@NotBlank 检查约束字符串是不是Null还有被Trim的长度是否大于0,只对字符串,且会去掉前后空格.
@NotEmpty 检查约束元素是否为NULL或者是EMPTY.
Booelan检查
@AssertTrue 验证 Boolean 对象是否为 true
@AssertFalse 验证 Boolean 对象是否为 false
长度检查
@Size(min=, max=) 验证对象(Array,Collection,Map,String)长度是否在给定的范围之内
@Length(min=, max=) string is between min and max included.
日期检查
@Past 验证 Date 和 Calendar 对象是否在当前时间之前
@Future 验证 Date 和 Calendar 对象是否在当前时间之后
@Pattern 验证 String 对象是否符合正则表达式的规则
.......等等
除此以外,我们还可以自定义一些数据校验规则
多环境切换
profile是Spring对不同环境提供不同配置功能的支持,可以通过激活不同的环境版本,实现快速切换环境;
1
2
3例如:
application-test.properties 代表测试环境配置
application-dev.properties 代表开发环境配置但是Springboot并不会直接启动这些配置文件,它默认使用application.properties主配置文件;
1
2
3#比如在配置文件中指定使用dev环境,我们可以通过设置不同的端口号进行测试;
#我们启动SpringBoot,就可以看到已经切换到dev下的配置了;
spring.profiles.active=devyaml的多文档块
1
2
3
4
5
6
7
8
9
10
11
12
13
14
15
16
17
18
19
20server:
port: 8081
#选择要激活那个环境块
spring:
profiles:
active: prod
server:
port: 8083
spring:
profiles: dev #配置环境的名称
server:
port: 8084
spring:
profiles: prod #配置环境的名称
静态资源
webjars
Webjars本质就是以jar包的方式引入我们的静态资源 , 我们以前要导入一个静态资源文件,直接导入即可。
使用SpringBoot需要使用Webjars,我们可以去搜索一下:
要使用jQuery,我们只要要引入jQuery对应版本的pom依赖即可!
1 | <dependency> |
第二种静态资源映射规则
- 下四个目录存放的静态资源可以被我们识别
1 | "classpath:/META-INF/resources/" |
模板引擎
安装thymeleaf依赖
1
2
3
4
5<!--thymeleaf-->
<dependency>
<groupId>org.springframework.boot</groupId>
<artifactId>spring-boot-starter-thymeleaf</artifactId>
</dependency>在
resources/templates下新建一个index.html1
2
3
4
5
6
7
8
9
10
<html lang="en" xmlns:th="http://www.thymeleaf.org">
<head>
<meta charset="UTF-8">
<title>title</title>
</head>
<body>
<h1>首页</h1>
</body>
</html>使用Controller测试
1
2
3
4
5
6
7
8
9
10
11
12package com.example.demo.controller;
import org.springframework.stereotype.Controller;
import org.springframework.web.bind.annotation.RequestMapping;
public class TestController {
public String index() {
return "index";
}
}在浏览器输入
http://localhost:8080/即可访问index.html
SpringMVC配置
官方文档:传送门
创建一个SpringMVC全局配置类
1 | package com.example.demo.config; |
整合JDBC
新建一个项目测试:springboot-data-jdbc ; 引入相应的模块!
编写yaml配置文件连接数据库;
配置完这一些东西后,我们就可以直接去使用了,因为SpringBoot已经默认帮我们进行了自动配置;去测试类测试一下
1
2
3
4
5
6
7
8
9
10
11
12
13
14
15
16
17
18
class SpringbootDataJdbcApplicationTests {
//DI注入数据源
DataSource dataSource;
public void contextLoads() throws SQLException {
//看一下默认数据源
System.out.println(dataSource.getClass());
//获得连接
Connection connection = dataSource.getConnection();
System.out.println(connection);
//关闭连接
connection.close();
}
}
集成Druid
Druid 是阿里巴巴开源平台上一个数据库连接池实现,结合了 C3P0、DBCP 等 DB 池的优点,同时加入了日志监控。
添加上 Druid 数据源依赖。
切换数据源;之前已经说过 Spring Boot 2.0 以上默认使用 com.zaxxer.hikari.HikariDataSource 数据源,但可以 通过 spring.datasource.type 指定数据源。
1
2
3
4
5
6
7
8spring:
datasource:
username: root
password: 123456
url: jdbc:mysql://localhost:3306/springboot?
serverTimezone=UTC&useUnicode=true&characterEncoding=utf-8
driver-class-name: com.mysql.cj.jdbc.Driver
type: com.alibaba.druid.pool.DruidDataSource # 自定义数据源数据源切换之后,在测试类中注入 DataSource,然后获取到它,输出一看便知是否成功切换;
切换成功!既然切换成功,就可以设置数据源连接初始化大小、最大连接数、等待时间、最小连接数 等设置项;
导入Log4j 的依赖
现在需要程序员自己为 DruidDataSource 绑定全局配置文件中的参数,再添加到容器中,而不再使用 Spring Boot 的自动生成了;我们需要 自己添加 DruidDataSource 组件到容器中,并绑定属性;
配置Druid数据源监控
整合MyBatis
- 导入 MyBatis 所需要的依赖
- 配置数据库连接信息
- 测试数据库是否连接成功!
- 创建实体类
- 创建mapper目录以及对应的 Mapper 接口
- 对应的Mapper映射文件
- maven配置资源过滤问题
SpringSecurity
Spring 是一个非常流行和成功的 Java 应用开发框架。Spring Security 基于 Spring 框架,提供了一套 Web 应用安全性的完整解决方案
- 新建一个初始的springboot项目web模块,thymeleaf模块
- 导入静态资源
- controller跳转
“认证”(Authentication)
身份验证是关于验证您的凭据,如用户名/用户ID和密码,以验证您的身份。
身份验证通常通过用户名和密码完成,有时与身份验证因素结合使用。
授权发生在系统成功验证您的身份后,最终会授予您访问资源(如信息,文件,数据库,资金,位置,几乎任何内容)的完全权限。
认证和授权
引入 Spring Security 模块
1 | <dependency> |
编写 Spring Security 配置类
官网:https://spring.io/projects/spring-security
编写基础配置类
1 | package com.kuang.config; |
定制请求的授权规则
1 |
|
在configure()方法中加入以下配置,开启自动配置的登录功能!
1 | // 开启自动配置的登录功能 |
查看刚才登录页的注释信息
1 | //定义认证规则 |
测试,我们可以使用这些账号登录进行测试!发现会报错!
加密
我们要将前端传过来的密码进行某种方式加密,否则就无法登录,修改代码
1 | //定义认证规则 |
.jpg)
.jpg)
.jpg)
.jpg)
.jpg)
.jpg)
.jpg)
.jpg)
.jpg)
.jpg)
.jpg)